Sooo... let's Go!
We want to create a picture from photo; we need to trace it first. The only one program we need is Inkspace (free vector graphics editor), get it from inkscape.org
Install & launch it. Drop a photo you want to trace. If the paper size seems too small, go to File - Document Properties and set the proper size. Now we should have something like this (I've cut the head from photo, I won't need it ;):

As we are going to work with several layers, let's rename current layer in "photo" or something (press Shift+Ctrl+L to view layers or use menu command Layer - Layers...)

Add new layer (press "+" button under the list with layers), switch to it; we'll draw here. I've also locked "photo" layers (click on lock image to lock/unlock layer) so that I couldn't draw there

Our main tool is Bezier

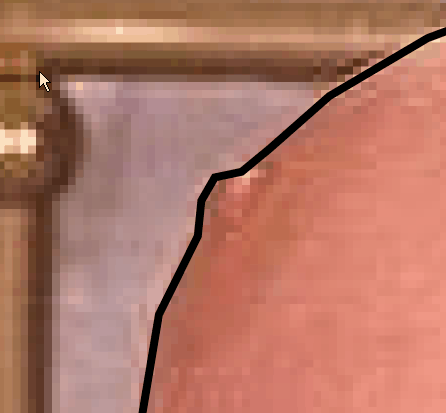
Try to test it to get how it works. Now we're going to outline every notable line of the photo with this tool. You may use it so that line will be smooth (hold mouse button) and you'll be able to get something like this:

But I prefer to make angular outline (just click on mouse button on different pixels) and make it smooth later

Here's what it's like
Use Enter key to stop drawing the line.
So, we'll have to go through entire image with this tool. You may hide "photo" layer (click on eye image) from time to time to see if everything going as you want.

If you'll get two separate line you want to connect, use the "Edit path by nodes" tool...

... select 2 nodes of lines you want to connect (select lines first using Shift key, then select nodes) ...

... and press Shift+J to join them (or click the third button on the toolbar, "Join selected nodes")

After all lines will be drawn, select all with Ctrl+A, then select all nodes with pressing Ctrl+A again (note that "Edit path by nodes" tool should be selected). Press Shift+S now(or the eighth button on the toolbar). All our lines will become smooth.

Now we are going to improve each line, because they'll most likely look weird after such manipulations; this is usually done by deleting nodes that look superfluous. If we have something like this:

We may just delete two nodes in the middle to get smooth line

Try also to move "levers" of the node to change the line if it looks weird

Note that after node deletion one of the neighbor nodes becomes "cusp node", one side of the line doesn't depends on the other. To make is "smooth node" again, select it and press Shift+S again, otherwise you may get unnecessary edges on the line.
So we've got smooth outline of the photo.

We need to make "filled objects" (don't really know how to call them) from these lines, so create one more layer

Copy everything and paste it on the new layer (use Ctrl-Alt-V to "paste in place"); hide "line" layer. Now, select all with Ctrl+A once again and use path - Stroke To Path command

Now check once more every outline and improve it. Add/delete nodes on the ends of lines (which technically are not "lines" anymore) to make them look sharp.


After that, we'll have something like this (you may see some difference with previous image)

Now, we are going to add missing parts ;) Let's start with cock. I'll take a cock from one of my images, but it was created just like this body (find a suitable photo and trace it to get a cock :D).

Resize / turn it to get the position / size you want. Delete unnecessary nodes afterwards
I've also added some pubic hair with "draw calligraphic tool".

Now, let's put the head on. Once again I'll use one from my pictures, but it was created by tracing of screenshot from WOW Model Viewer


Body with head:

Now I'd most likely started to color the picture, but this time I decided to give her hand and legs also ;)
So, we search a suitable hand (I usually google for "draw hand" or something like that) and trace it

That hand was not so good as I thought so I had to find the other one :D Completed:

Legs... that's always hard for me. I've spent a couple of hours with those, searching legs, tracing legs, searching feet...

In the end, they look weird because of different orientation of body and legs, but sexy enough to stop :D

The last stage is coloring; add new layer below "fill" layer.

There should be an easier way to fill what we need with color (something like using Fill tool with improving fill edges etc), but I'm used to do next: use Bezier Tool to outline the whole body once more, we need to get a single closed line; it'll probably take much time

After the outline is closed (we've got to the place we started from and joined first and last node), set the fill color and change the line width to 0 (Shift+Crtl+F to show that window)

Now there should be something like this (if you'll hide all layers except "color")

You'll probably get some regions inside fill that should not be filled, like this

To make it "holed", draw another closed line on that region; fill it with any color to see if it's really closed.

Now, select both this piece and the main file, go to menu and use path - Exclusion command.

By the way, try each of these commands (Union, Difference, etc) on some simpple objects (rounds, squares, etc) to see how they work. The result depends on which object is upper, to you may also arrange then with Object - Raise, Lower, Raise to Top, Layer to Bottom commands.
Afterwards, create the same fill for hair, eyes and other uncolored parts.

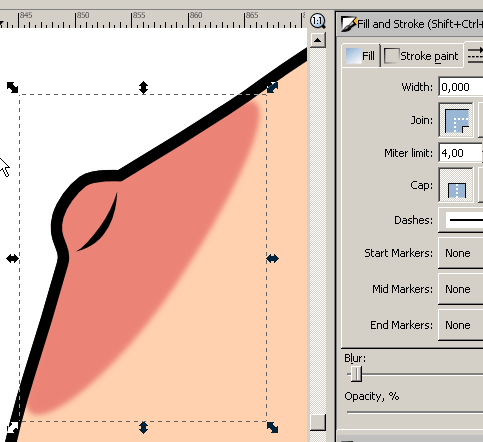
I've found Blur effect rather suitable while working with areola
Finally we're done with this busty Blood Elf transsexual :)

No comments:
Post a Comment